How to Build a Check Register in Excel
Build a check register in Excel and learn when teams should switch to an app for shared, auditable financial tracking.
A check register in Excel tracks every payment, deposit, and withdrawal in a single structured log, with a running balance that updates automatically. It is a straightforward spreadsheet to build, and when set up correctly it becomes a reliable reference for reconciling accounts, tracking spending by category, and spotting discrepancies before they become problems. This guide covers the full setup, the formulas worth knowing, and how to extend it into something a whole team can use.
What a Check Register Is
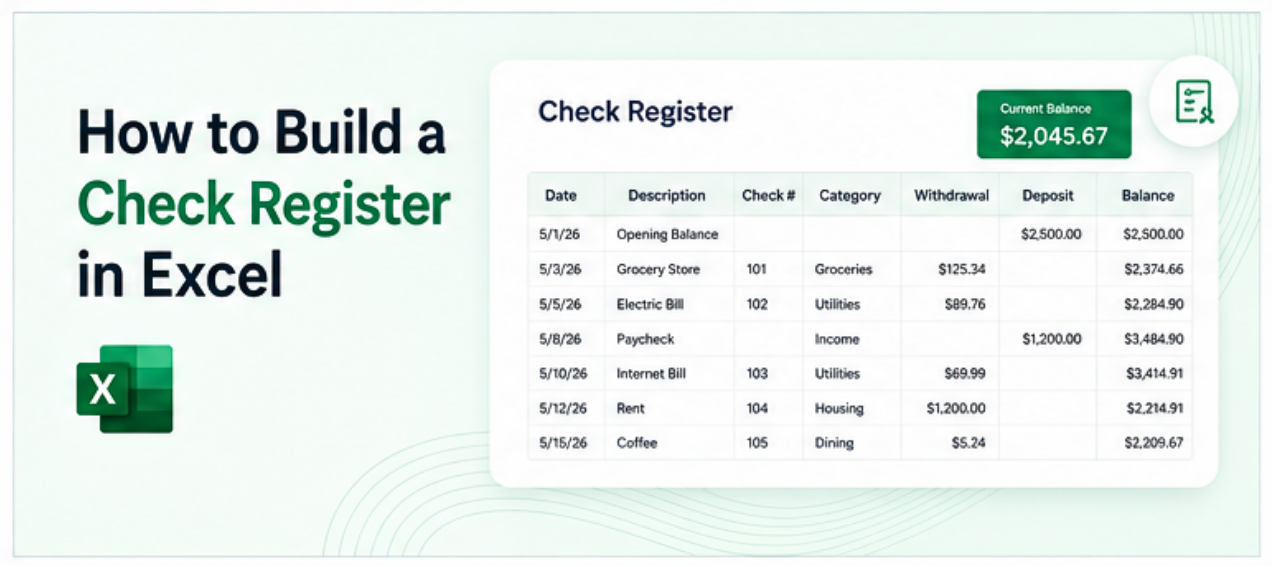
A check register is a chronological log of all financial transactions in an account. It typically includes the date, a description or payee name, a check number or reference, the amount (split into credits and debits), and a running balance after each transaction.
Historically kept in paper form alongside a physical checkbook, most businesses now maintain check registers digitally. Excel is one of the most common tools for this since the structure of a spreadsheet maps well to the column layout a register requires.
Step 1: Set Up the Column Headers
Open a new Excel workbook and start in Sheet1. Rename the sheet "Register."
In row 1, enter the following column headers across the columns:
Column A: Date
Column B: Check Number (or Reference)
Column C: Payee or Description
Column D: Category
Column E: Debit (money out)
Column F: Credit (money in)
Column G: Balance
Column H: Cleared (Y or N, for reconciliation)
Column I: Notes
Select all of row 1, apply bold formatting, and optionally add a background fill color to distinguish the header from the data rows.
Step 2: Enter the Starting Balance
In row 2, enter the starting balance of the account.
Leave columns A through F empty in row 2. In column G (Balance), enter the current account balance as a number. This is the starting point from which the running balance will calculate.
In column I (Notes), enter "Opening Balance" so it is clear what this row represents.
Step 3: Set Up the Running Balance Formula
The running balance formula adds credits and subtracts debits from the previous row's balance. It needs to start in row 3, since row 2 holds the opening balance.
In cell G3, enter: =G2+F3-E3
This takes the balance from the previous row, adds any credit in the current row, and subtracts any debit.
Copy this formula down through enough rows to cover anticipated use, at least 200 to 500 rows, since adding the formula row by row becomes tedious later. Select G3, copy it, then select G4 through G500 and paste.
Step 4: Format the Columns
Apply currency formatting to columns E, F, and G. Select each column, right click, go to Format Cells, choose Currency, and set the decimal places to 2.
Apply date formatting to column A. Select the column, go to Format Cells, and choose the preferred date format (MM/DD/YYYY is common for US based registers).
Set column H to a dropdown with two options for consistency. Select the column range, go to Data, Data Validation, choose List, and enter Y,N as the source. This makes reconciliation faster since users can select from a dropdown rather than typing.
Step 5: Add Category Based Spending Totals
A summary section at the top or on a separate sheet adds useful context without changing the register structure.
Add a new sheet called "Summary." In this sheet, use SUMIF formulas to total spending by category, pulling from the register.
For example, to total all debits categorized as "Utilities":
=SUMIF(Register!D:D,"Utilities",Register!E:E)
Repeat this formula for each spending category used in the register (Office Supplies, Payroll, Software, Travel, etc.). This gives a quick category breakdown without building a separate tracker.
Step 6: Highlight Uncleared Transactions
Conditional formatting can flag transactions that have not yet cleared the bank, making reconciliation faster.
Select column H (Cleared), then go to Home, Conditional Formatting, Highlight Cell Rules, Equal To. Set "N" to format with a yellow fill. Any uncleared transaction will stand out in the register.
Step 7: Protect the Balance Column
The balance column is formula driven and should not be edited directly. Protect it to prevent accidental overwriting.
Right click the column G header, select Format Cells, go to the Protection tab, and check "Locked." Then go to Review, Protect Sheet, and set a password. Allow editing only in the columns that should accept input (A through F, H, and I).
Common Mistakes to Avoid
Entering credits as negative debits. Keep credits and debits in separate columns. Mixing negative and positive numbers in one column makes formulas and summaries harder to maintain.
Skipping categories. Leaving the category column blank makes it impossible to summarize spending later. Setting up a dropdown list for categories from the start (using Data Validation) makes this faster to fill in consistently.
Not copying the balance formula far enough. If the formula is only copied to row 100 and the register grows past that, the balance column goes blank for new rows. Copy the formula to at least 500 rows at setup.
When a Shared Dashboard Makes More Sense
A single user managing their own check register in Excel works well with this setup. When more than one person needs to view the register, run reports, or submit transactions, the standalone spreadsheet approach starts to show limitations.
A team of three submitting expenses into the same Excel file at the same time is asking for version conflicts. A manager who wants a summary dashboard without scrolling through hundreds of rows of transactions needs something more than a SUMIF formula on a separate sheet.
A no code tool connected to the Excel register can surface the summary data, the category totals, and the current balance in a clean dashboard that updates as the underlying spreadsheet changes, accessible from a browser without anyone needing to open the file directly.
See How to Turn a Spreadsheet Into an App Without Code for more on how this works.
Frequently Asked Questions
Related Topics
Build Your Internal Tools With Huddle
Huddle is a zero code application builder that connects to Google Sheets, Airtable, Excel 365, HubSpot, and Salesforce without requiring data migration. Build dashboards, forms, and portals with drag and drop widgets and publish to a shareable link in minutes.
Start building with Huddle